The Mines of Nurga
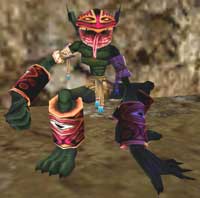
The Mines of Nurga are a foul-smelling collection of rat-infested corridors, chisled out of solid rock in the Frontier Mountains entirely by the blood and sweat of slave labor. Peopled by its cruel taskmasters the goblins...although goblins aren't people, so perhaps one should say "gobbled" instead of "peopled", though the term "gobbled" implies an edibility not present...
I digress.
The denizens of Nurga consist rather simply of just goblins and rats. (the sleeping ogre for the monk epic is still there in the same spot, included in my map) The goblins come in 6 basic flavors: warrior , rogue , necromancer , shaman , wizard and shadowknight . A few things apply to these creatures in general throughout the zone:
Goblin Loot and Faction
Always - coin (from a few gold up to 9pp)
Uncommon - Mt. Death Mineral Salts or Green Goblin Skins or Drogan Warlord's Insignia
Rare - fine gem to include: diamond, ruby, star ruby, flame emerald, sapphire, fire opal (no blue diamonds, alas)
Very rare - a goblin of the proper stage and class (more on that later) will drop a non-lore item with no stats that is used for one of the vengeance quests given by freed slaves
None of the goblins here carry weapons. For the ogres, this means no weapons drop. Killing them (goblins, not ogres...FOCUS) gives the following faction adjustments: Goblins of Mountain Death gets worse , Brood of Di'Zok gets better .
Rat Loot and Faction
Except for the named one, rats drop nothing at all and give no faction.
Monster Stages
As alluded to earlier, the monsters in Nurga can be found throughout the mines in a series of 5 stages of progressing difficulty. Each stage consists of 1 rat type and 6 goblin types (one from each of the 6 classes mentioned above and repeated here for those of you with gnome-sized attention spans: NEC, WIZ, SHM, WAR, ROG, SHD). For identification purposes, the zoologists at Verant have given each species of goblin from the various stages a unique name. The following is excerpted from Diminimus' Field Guide to Goblins, also available from Zarchon Press (paperback, 213 pages):
Stage 1 (green to 63...about level 38-40?)
a mine rat
a goblin miner (WAR)
a goblin back biter (ROG)
a goblin life drinker (SHD)
a goblin blood caster (NEC)
a goblin spirit weaver (SHM)
a goblin flame douser (WIZ)
Stage 2 (also green to 63, maybe 42-ish?)
a diseased mine rat
a goblin slave keeper (WAR)
a goblin gold hoarder (ROG)
a goblin soul stealer (SHD)
a goblin blight caller (NEC)
a goblin spirit terror (SHM)
a goblin frost caller (WIZ)
Stage 3 (light blue to 63, whazzat? about 45?)
a viscious mine rat
a goblin slave driver (WAR)
a goblin stabber (ROG)
a goblin life stealer (SHD)
a goblin blight caster (NEC)
a goblin spirit mystic (SHM)
a goblin arcane master (WIZ)
Stage 4 (also light blue to 63...maybe 48-ish?)
a dangerous mine rat
a goblin taskmaster (WAR)
a goblin sneak (ROG)
a goblin blood knight (SHD)
a goblin death caller (NEC)
a goblin spirit lord (SHM)
a goblin flame dancer (WIZ)
Stage 5 (dark blue to 65, level 51+ ?)
a menacing mine rat
a goblin overseer (WAR)
a goblin blackguard (ROG)
a goblin death knight (SHD)
a goblin death caster (NEC)
a goblin spirit chanter (SHM)
a goblin flame chanter (WIZ)
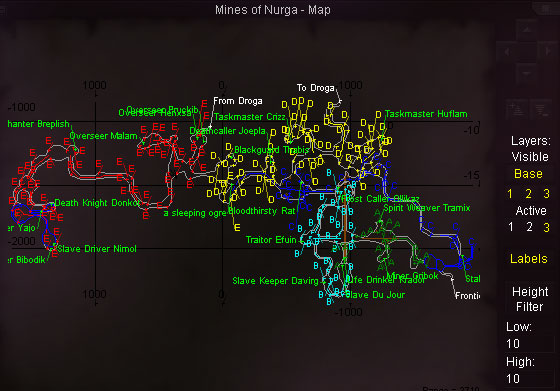
Each stage represents a set of mobs that can share a specific spawn point. Spawn points of a given stage are organized within the dungeon geographically. That means, for example, you might find a series of connected stage 1 rooms containing all stage 1 spawn points from which any of the mobs in the stage 1 list might pop on any given respawn. I'm trying to keep the ogres up with the rest of the grouple, people. Patience. Going deeper into the dungeon (sometimes, but not always, past a physical demarcation point like a drop off) takes you into an area of stage 2 rooms, etc. See below for a link to the in-game maps I have provided for download. They include markers for spawn points color-coded and labeled by stage.
Regarding the Classes
Each class grows in power with each stage as it rises in level. Information is partial, but here is enough to give you a rough idea of what to expect.
Rats appear to be basically warriors like their respective goblin WAR class in each stage. Unlike player characters, goblins all have the same max hit regardless of class. It just varies with their level and therefore stage. Similarly, it looks like the casters in a given stage have about the same hp's as their melee cousins in that same stage. Melee do have better dps, though this is probably due to the fact that they get double attacks and bash. Casters can dodge and melee dodge and parry.
Goblin fashion won't be turning too many heads this season. The goblins of Nurga wear only 3 kinds of outfits:
 <-- warriors and shadowknights
<-- a
 ll
casters
ll
casters <-- rogues
From parsing logs, I made this chart to show the average relative toughness of the various stages (rounded off, generalized and whatever other disclaimers you can think of...but it gets ya in the ballpark at least)
Stage 1 - 2400 hp, max @ 91
Stage 2 - 4000 hp, max @ 98
Stage 3 - 6000 hp, max @ 115
Stage 4 - 8000 hp, max @ 123
Stage 5 - 10k+ hp, max @ 139
As a side note, the named aren't any tougher within a given stage than their generic counterparts. Death Knight Donkot had the same hp's as a regular goblin death knight. He did have a 140 max hit, though. Woohoo. One lousy point extra. Also, Life Drinker Krador (shadowknight) tried to hit me with Heat Blood when no generic SK ever did. Could just be coincidence, I guess.
The shadownights all HarmTouch, stage 3 is about 450 hp if I recall and stage 5 is 701. They don't seem to cast much, but I have rarely been lifetapped. Can't say by how much, most everything gets swallowed by the 1500 hp of Arcane Rune.
Load up on magic resistance for the casters, folks. They got more roots than a grove full of treants watching reruns of a critically acclaimed mini-series starring LeVar Burton.
More specifically:
The goblin necromancers order from the following menu :
Venom of the Snake
Chilling Embrace
Scourge
Root
Screaming Terror
Boil Blood
Infetious Cloud
Ignite Bones
Asystole
Incinerate Bones
Dooming Darkness
Retrogression
dispell
Torba's Acid Blast
Ignite Blood
Cascading Darkness
Paralyzing Earth
Insidious Retrogression
The goblin shaman (say THAT five times really fast) have a repertoire that includes :
Spirits of Frost
Malaisement
Venom of the Snake
Root
Plague
dispell
Shock of the Tainted
and spells with the messages that you
"screams in pain"
"sweats and looks feverish"
"body is wracked by shocks of poison"
Interesting note: The shaman class attempt not only to dispell your buffs, but they cast it on themselves and have managed to remove Forlorn Deeds and my mana tap DoT so far.
The wizards order their nukes right out of the catalog, hitting for maxes the same as players get :
Immobilize
Elnerick's Entombment of Ice
Thunderstrike
Ice Shock
Bonds of Force
Tishan's Clash
Garrison's Mighty Mana Shock
Thunderclap
Inferno Shock
Wrath of Al'Kabor
Rend
Ice Comet
Yup, that's the full 1120 point uber nuke for it's level. They've been known to land as many as 3 to 4 in a single battle!
Not all stages of a given caster class cast all spells listed above. Using wizards as an example, only the goblin flame chanter (stage 5 WIZ) has access to Ice Comet in addition to the other spells for that class. Common sense applies, here. Ogres, try to find a gnome you haven't punted yet to help you.
The Named
There are three distinct kinds of named mobs in Nurga. First is the singular and unique slave mob. Though there is a whole list of possible slaves to exist, there is only ever one slave up at a time and it always spawns in the same spot. They are the only non-KoS mob in the place (not counting the sleeping ogre) . They drop nothing at all, were green to me and instantly re-spawn if killed (no faction hits). Their purpose is as quest mob. Each slave must be freed to bring forth the next one. Once freed, they despawn from Nurga forever . That is correct. Each slave can be freed only once per server. The purpose of freeing the slaves is this: when they despawn from Nurga, the slave will respawn in the zone near its ancestral home (the slaves cycle through many different races). Activated in this way, the slave will henceforth function as a standard quest npc. They will appear in safe places away from KoS mobs, are on beta neutral faction and will talk to anyone. They require 4 drops from mobs within Nurga as vengeance for having been enslaved (1 lore drop from a named goblin and 3 others from the generic goblins), after which they supply a usually quite handsome reward (see below for a list of ingredients and rewards).
The next type of named are 3 unique goblins that drop the quest pieces required to initiate the spawn ring for the initial freeing of a slave quest. No matter which slave is currently up, it is the same recipe of 3 lore drops to start the quest. You need a Small Iron Shackle Key from Overseer Pruckib , a Pouch of Supplies from Taskmaster Yajo and a Strong Restorative from Slave Driver Nimol . There are no placeholders for these 3 mobs. They spawn in the same place every time and always drop the quest bit (and nothing else but some coin). Every thing else in the zone is on a 20-minute timer, but these 3 fellows are on a much longer timer...2+ hours (don't know quite how long).
Finally, sprinkled throughout the dungeon are a variety of placeholders for a collection of moderately rare named goblins. Most of the various class types of goblin have an associated named, whose placeholder is always a generic goblin of the same class type. For example, Spirit Weaver Tramix's placeholder is always a goblin spirit weaver. This is one way to identify a named spawn point. Every other spawn will vary in what pops there by the list for that stage. Named spawns always have the same placeholder. Another example: Overseer Malam's placeholder is always a goblin overseer. Thanks for your patience. Once again, that second example was for the kids in the back that came in on the short yellow bus from Oggok. Poor little Murtie. A face that could scare a pack of scaled wolves off a meat wagon....tsk, tsk.
But I digress...
There are a couple of exceptions to the placeholder identification rule (rule #3b in your textbooks). Traitor Efuin, a burynai named has a goblin slave driver as his placeholder. I'm pretty sure it's a him, that damn fur makes it hard to tell. Also, Blackguard Thabis has a goblin sneak for his placeholder (same class, different stage, /shrug).
All of the placeholder named drop loot. They each have a common loot drop and a rare one. About half of them also drop a Lore quest bit with no stats that is part of the vengeance quests given by freed slaves as mentioned above. If a given named has a quest drop, it will always drop regardless of the quest piece (i.e. you'd get both for a given kill). Here is a list of all the placeholder named in the zone. For locations, download the in-game maps linked below. The named spawns are labeled there. If you zoom in while standing in the room, you will actually be able to tell which of the mobs in the room is standing on the named point. I have personally verified each one and made the map myself, however, no warranty is expressed or implied (the erudite lawyers make me say that).
Placeholder nameds, loot only :
Stabber Remmy
Spirit Weaver Tramix
Miner Gribok
Life Drinker Krador
Slave Keeper Davirg
Traitor Efuin
Frost Caller Ollikaz
Placeholder nameds, loot + lore quest drop :
a blood thirsty mine rat
Taskmaster Huflam
Taskmaster Crizz
Death Caller Joepla
Blackguard Thabis
Overseer Henxsa
Overseer Malam
Spirit Chanter Bibodik
Death Knight Donkot
Flame Chanter Breplish
Slaves and Rewards
What follows is the list of slaves with locations once freed, what they want and what reward they give. Good stuff, Maynard.
Pungub Brawlum (Ogre) - Overthere ( 2354, 2579 )
Wants: 3 Nurgan Taskmaster Whips (goblin taskmasters) 1 Dagger of the Sneak (Deathcaller Thabis)
REWARD - Dingy Pauldron of Brawling
MAGIC LORE NO DROP
Slot: SHOULDER
AC: 14
STR +10 AGI +10 HP +40
SV FIRE +10 SV COLD +10 SV MAGIC +10
Recommended level of 45
WT: 2.3 Size: MEDIUM
Class: WAR CLR PAL SHD BRD
Race: ALL
Osvima K'Matim (Dark Elf Female) - Overthere ( 2352, 2508 )
Wants: 3 Rings of Flame Chanting (goblin flame chanters), 1 Writ of Flame Chanting (Flame Chanter Breplish)
REWARD - Black Cord of the Virtuous
MAGIC ITEM LORE ITEM NO DROP
Slot: WAIST
AC: 12
DEX: +5 STA: +5 WIS: +5 HP: +45 MANA: +45
SV FIRE: +5 SV COLD: +5 SV MAGIC: +5
Recommended level of 50.
Focus Effect: Extended Enhancement III
WT: 1.3 Size: SMALL
Class: CLR DRU SHM
Race: ALL
Xiokai Rissthrum (Iksar Female) - Lake of Ill Omen ( 6222, -6952 )
Wants: 3 Bracers of Blood (A goblin Blood Knight), 1 Scrolls of Joepla (Deathcaller Joepla)
REWARD - Crafty Mask of Awareness
MAGIC ITEM LORE ITEM NO DROP
Slot: FACE
AC: 8
DEX: +6 CHA: +6 INT: +8 HP: +25 MANA: +40
SV DISEASE: +12 SV POISON: +12
Recommended level of 45.
WT: 1.1 Size: SMALL
Class: NEC WIZ MAG ENC
Race: ALL
Doovix Mruzzik (Iksar Male) - Lake of Ill Omen ( 6175, -6898 )
Wants: 3 Blackguard Caps (goblin blackguards), 1 Malam's Lucky Charm (Overseer Malam)
REWARD - Silver Bracelet of the Heavens
MAGIC ITEM LORE ITEM NO DROP
Slot: WRIST
AC: 8
DEX: 8 STA: 5 CHA 8 WIS: 5 INT: 5 HP: 40 MANA: 40
Recommended level of 50.
WT: 0.2 Size: TINY
Class: ALL
Race: ALL
Rock Shaper Dritam (Burnyai) - Frontier Mountains ( -1677, 2103 )
Wants: 3 Flame Dancer Beads (Goblin Flame Dancers) 1 Blood Thirsty Rat Hide (Blood Thirst Rat)
REWARD - Earthen Gloves of Wisdom
MAGIC ITEM LORE ITEM NO DROP
Slot: HANDS
AC: 12
WIS: +15 HP: +35 MANA: +35
SV DISEASE: +10 SV MAGIC: +5 SV POISON: +10
Recommended level of 45.
WT: 1.5 Size: SMALL
Class: CLR DRU SHM
Race: ALL
Cenobite Pakclaw (Burnyai) - Frontier Mountains ( -1715, 2150 )
Wants: 3 Sprit Chanter Jewels (goblin Spritchanters) and 1 Book of Spirit Chanting (Spirit Chanter Bibodik)
REWARD - Brimming Chalice of Youth
MAGIC ITEM LORE ITEM NODROP
Slot: RANGE PRIMARY SECONDARY
STA: +8 WIS: +12 INT: +12 HP: +40 MANA: + 50
SV MAGIC: +15
Recommended level of 50
Focus Effect: Extended Range III
WT: 1.3 Size: Small
Class: CLR DRU SHM NEC WIZ MAG ENC
Race: ALL
Crix Tzo'mok (Sarnak) - Lake of Ill Omen ( -1392, 3357 )
Wants: 3 Death Marks of Nurga (goblin death callers) 1 Silver Braclet of Crizz (Taskmaster Crizz)
REWARD - Hideous Coif of Woe
MAGIC ITEM LORE ITEM NO DROP
Slot: HEAD
AC: 14
STR +10 DEX +5 STA +10 WIS +5 AGI +5 HP +40 MANA +40
SV FIRE +8 SV DISEASE +8 SV COLD +8 SV MAGIC +8
Recommended level of 45
WT: 2.5 Size: MEDUIM
Class: WAR CLR PAL RNG SHD BRD ROG SHM
Race: ALL
Yimic Pxo'hab (Sarnak) - Lake of Ill Omen ( -2982, 2579 )
Wants: 3 Totems of Death Casting (goblin death casters) and 1 Donkot's Deathblade (Death Knight Donkot)
REWARD - Grim Necklace of Destruction
MAGIC ITEM LORE ITEM NO DROP
Slot: NECK
AC: 9
HP: +50 MANA: +50
SV FIRE: +7 SV DISEASE: +7 SV COLD: +7 SV MAGIC: +7
SV POISON: +7
Recommended level of 50.
Effect: Vengence I (Worn)
WT: 1.6 Size: SMALL
Class: WAR PAR RNG SHD MNK BRD ROG BST
Race: ALL
Wekland Greenfoot (Wood Elf Male) - Firona Vie ( -2840, 2412 )
Wants: 3 Nurga Overseer Necklaces (goblin overseers) 1 Bone Collar of Henxsa (Overseer Henxsa)
REWARD - Silken Cape of Exploration
MAGIC ITEM LORE ITEM NO DROP
Slot: BACK
AC: 8
DEX +15 AGI +15 HP +50 MANA +50
SV FIRE +6 SV DISEASE +6 SV COLD +6 SV MAGIC +6 SV POISON +6
Recommended level 50
Effect: Aura of Health
WT: 1.2 Size: SMALL
Class: ALL
Race: ALL
Rinnala Sweetsong (Wood Elf Female) - Firona Vie ( -2922, 2414 )
Wants: 3 Nurgan Spirit Fetishs and 1 Huflams Signet Ring (Taskmaster Huflam)
REWARD - Ring of Sweet Serenades
MAGIC ITEM LORE ITEM NO DROP
Slot: FINGERS
AC: 6
STR: +10 STA: +10 WIS: +5 INT: +5 HP: +50 MANA: +25
SV FIRE: +3 SV DISEASE: +3 SV COLD: +3 SV MAGIC: +3 SV POISON: +3
Recommended level of 45.
WT: 0.3 Size: TINY
Class: WAR PAL RNG SHD MNK BRD ROG BST
Race: ALL
(most of the information for this list came from a thread at the SafeHouse started by Caanus Grey, thanks for all that work!)
Freeing the Slaves
Had the chance to free a slave (actually 5 of them). Here's what we observed:
You can hail the slave and converse about what items are needed to start the ring event, but no flag is obtained by doing so and it will work fine to just hand in the 3 items ( Small Iron Shackle Key , Pouch of Supplies , Strong Restorative ) all at once. Immediately upon doing so, a zone-wide emote goes off: " An alarm sounds summoning goblins to prevent the enslaved miner from escaping ." Namely, the first of 6 waves of goblins spawn.
Each wave brings 5 goblins (red to 43, dark blue to 55) consisting of 4 goblin reavers and 1 goblin sergeant . They are straight melee and not particularly resistent. I never bothered with Tash. All 5 of them are static spawns. They are KoS to your party, but won't touch the slave. The point is not to protect the slave, who just stands there perfectly still while you do all the fighting. The point is to kill your way through all 6 waves of goblins in the time limit (reported to be two hours).
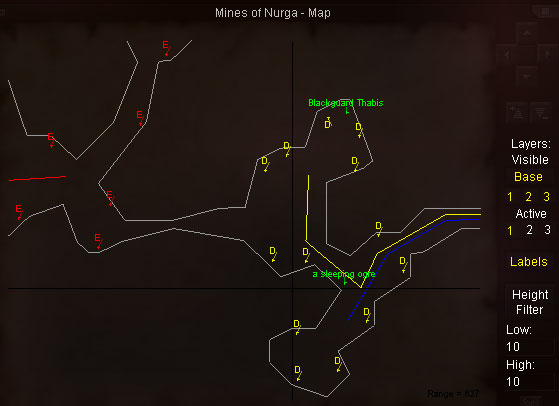
The sergeant pops in about the middle of the room, with the four reavers arranged around him in a big square. We went back and freed a few more slaves and I was fortunate enough to get an overhead screenshot of the ring goblin's deployment (see below). The burynai, Cenobite Pakclaw , at the very bottom is our slave, facing the wall. You can just see the name tag for one of our pets also at the bottom. If you huddle against the wall to the slave's right side, you can avoid any agro when a wave of goblins spawn. The picture was taken looking down from the drop-off ledge just above (where Life Drinker Krador's placeholder is).

It's possible to single pull most of them, but if you grab the back reaver before the sergeant, pathing will bring them both. The fights can last a while and tend to wander around due to progessive effects of knockbacks. To avoid adds, lull is recommended. The next wave immediately pops when you kill the 5th and last spawn from the previous wave, no matter which one of the 5 goblins that happens to be.
The final wave spawns in the same pattern as before with 4 reavers in an outer square with the emote: " A large goblin appears, Mine Overseer Narrik has come to prevent the escape ." This time, the sergeant in the middle is replaced by Mine Overseer Narrik . Narrik is also straight melee. Apart from a ton of hp's, he is not much different than a sergent (see below for more detailed information from our parsed log of the fight), though he does hit harder and flurries. When everyone is wiped out from this wave...you win. Another zone-wide emote goes off: " The mine overseer and his minions have been defeated. An enslaved miner has been successfully freed ." The freed slave despawns and appears in a safe spot outside it's home (see Maps section for links to downloadable in-game maps updated with these locations). The next slave to be freed immediately spawns in its place and if you have another set of components, you can initiate another ring event without delay.
There is no loot on any of these mobs except the zone-wide generic drops of coin and maybe a gem. The point is solely to free a slave so that it can go off to become a quest npc. Until then, nobody on that server can get the reward that slave offers and the related quest bits are useless.
Some miscellaneous notes .
You are going to be fighting in close proximity to the slave you're trying to free. AoE's are strongly discouraged. Even so, targetting can be quite a mess and you might find an errant pet suddenly chomping the goods on your slave. Killing the slave is baaaaad, m'kay? (even though they repop instantly) For the ogres, this means you'd end up killing a lot of goblins for nothing. Never fear, however. If you happen to accidentally agro the slave, just mez and blur. If mez fades and he doesn't re-agro...you're good to go. It happened on both of our slave freeings and both times we were perfectly okay after successful blur.
For posterity, be it known to all that Crix Tzo'mok and Wekland Greenfoot were freed on Morell-Thule by the talented, organized and quick responding efforts of the following noble souls: Eryck (61 MNK), Cerryn (56 SHM), Nayrr (43 SHD), Urda (55 SHM), Blackberri (56 DRU), Dirkafindel (62 CLR), Ishandra (63 CLR), Lome (63 NEC) and more humbly, yours truly (63 ENC).
Parsed Info
I excerpted what I call a "clean" fight (no simultaneous handling of two mobs with the same name to confuse things) from the rather lenghty log for parsing and detailed analysis, one each from a goblin reaver , goblin sergeant and Mine Overseer Narrik . For parsing, I used the new beta-version of Yalp , which now handles non-melee damage messages. That was a HUGE help, because it gets all nukes and even hits from damage shields. One thing it can't capture is damage from DoT's. For accuracy, I manually went through and identified the DoT's in use by their cast messages and added their damage when calculating the mob's total hitpoints. I also looked into the additional damage done by our pets that were buffed with Night's Dark Terror (engenders a 25-35pt level-based lifetap proc that fires fairly frequently) Unlike with players, however, pet procs give no "non-melee damage message" for the parser to capture. Using care to note the proc's tell-tale emote (" %T staggers ") and add them up manually, I believe my final hitpoint estimates are accurate to within the nearest 1k hp.
Gobline Reaver
Total hitpoints: 20,000
Offensive damage dealt to party: 2050
Overall DPS: 26.3
Fight time: 1min 18sec
Max hit: 142
Goblin Sergeant
Total hitpoints: 40,000
Offensive damage dealt to party: 5631
Overall DPS: 34.3
Fight time: 2min 54sec
Max hit: 153
Mine Overseer Narrik
Total hitpoints: 88,000
Offensive damage dealt to party: 14,941
Overall DPS: 59.3
Fight time: 4min 19sec
Max hit: 182
Flurry: 11 times, random delay from as little as 2sec to as long as 1min 9sec
All 3 types have a chance to mitigate slow. It appears the mitigation can be to various amounts, kind of like partial resists for nukes. They hit, kick and bash like standard melee. None of them enraged or performed other special abilities except the Mine Overseer who evidently spawns into one of a few levels (51 to 53-ish). His more powerful incarnations can summon.
For those of you who with a Geerlock Abacus and a penchant for numbers, I also made a spreadsheet .
Maps
As promised, here are the links to the in-game maps I made of spawn points, named spawns and wanderer's paths.
Regarding the color coding :
A green capital "A" marks stage 1 spawn points. Similarly, a light blue "B" shows stage 2 spawns, a dark blue "C" denotes stage 3, a yellow "D" is for stage 4 and a red "E" warns of a stage 5 spawn. Wanderers are depicted by their path, being a line of the appropriate color for their stage. This is not only useful for choosing the appropriate level of difficulty for your xp group, but also for targetting one's efforts when looking for a specific quest drop found only on a particular goblin in one of the stages. You can also use the map to spot safe spots and places to go visible for buffing, summoning of pets, etc.
All named appear in bright green for easy identifcation, however, they are of the appropriate level for whatever stage area they can be found in. My labels were all placed in layer 3 of the map (though you need to download all layers). Once in game, if you want to turn off the labels because it's too crowded, just click off layer 3, although by zooming in a bit it gets much better. Once again, ogres will need to have a guide with them at all times as reading a map of any sort is probably completely out of the question.
(update 8/30/03 7:15pm - fixed a light blue wanderer's path, deleted erroneous red spawn point near Henxsa)
(update 8/31/03 2:00 pm - discovered I had inadvertantly been making corrections to layer 1 instead of layer 3 where all my other notes are, fixed this by moving everything to layer 3 once again)
(update 9/2/03 1:20pm - removed erroneous stage 5 wanderer from under water at bottom, added two seemingly out of place spawns that may be on longer timer for some reason: a stage 2 spawn in Nimol's room and a stage 1 spawn in stage 5 hall near the bottom.../shrug)
(update 9/4/03 7:45pm - fixed a stage 2 wanderer path shown as one that was actually 2 separate paths, updated linked image of zoomed-in map to reflect content changes)
Download Instructions : right click, choose Save Target As...and select your everquest/maps directory, overwrite the old.
Nurga layer 1
Nurga layer 2
Nurga layer 3
Added these maps, too. I marked them with the spots where the slaves go when freed as quest npc's. Since it was just a few labels each, I put them on layer 1 with the existing labels. I used bright green again for consistency. Side note: all of these base maps come from the great collection at maps.eq-toolbox , thanks much to them!
Firiona Vie
Frontier Mountains
Lake of Ill Omen
The Overthere
That's about it, I guess. Enjoy Nurga, be safe and when you see the signature gatherers in PoK for the ogre breeding-control laws, please sign the petition. We almost have enough to get Measure "O" on the ballot. Thanks in advance for your help.